for Beginners: Basics and Essential Commands
What is Git?
Git serves as a distributed version control system that tracks changes in your code, enabling multiple developers to collaborate efficiently without overwriting each other’s work. Before Git, developers faced issues like manually copying code via pendrives or email, leading to version confusion, lost changes, and merge nightmares when combining files.
Why Use Git
Git eliminates the chaos of traditional methods by creating snapshots of your project at any point, allowing you to revert changes, experiment safely, and maintain a complete history locally. Its distributed nature means every developer has a full copy of the repository, reducing reliance on central servers and enabling offline work.

Core Concepts
Repository (Repo): A directory containing your project files and their complete revision history, either local or remote.
Working Directory: Your everyday files where you edit code; changes here aren’t tracked until staged.
Staging Area (Index): Intermediate zone where you select specific changes to prepare for a commit.Commit: A saved snapshot of staged changes with a unique ID and descriptive message, forming your project’s history.
Branch: A lightweight pointer to a series of commits, letting you work on features independently from the main codebase.
HEAD: Points to the current commit or branch you’re on, moving forward as you commit.
Basic Workflow
Start with an empty folder for your project.
Initialize:
git initcreates a new repo with a.gitfolder.Check status:
git statusshows modified, staged, or untracked files.Stage changes:
git add filename.txt(orgit add .for all) moves files to staging.Commit:
git commit -m "Initial project setup"saves the snapshot.View history:
git logdisplays commits with IDs, authors, and messages.Create branch:
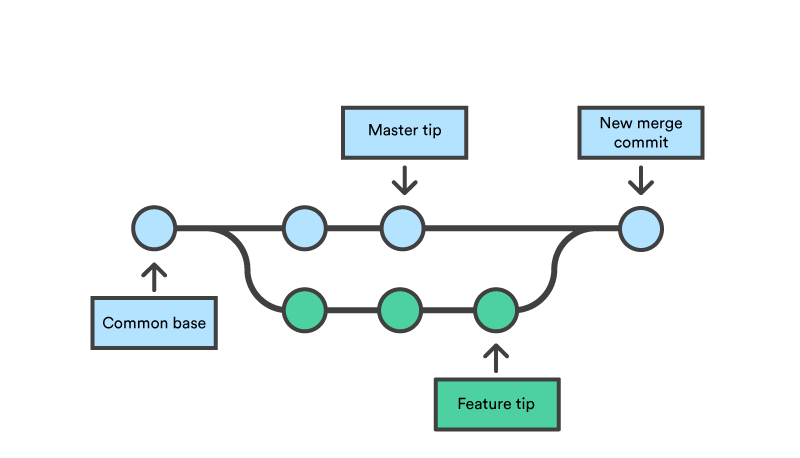
git branch feature-xthengit checkout feature-x(orgit switch feature-x) to work separately.Merge: Switch to main (
git checkout main), thengit merge feature-xto combine.
This workflow mirrors real development: edit in working directory → stage selectively → commit to repo → branch for features → merge when ready.

Common Commands
| Command | Purpose | Example |
git init | Start new repo | git init |
git status | Check file states | git status |
git add | Stage changes | git add . |
git commit | Save snapshot | git commit -m "msg" |
git log | View history | git log --oneline |
git branch | List/manage branches | git branch -d old-branch |
git checkout | Switch branches/commits | git checkout -b new-branch |
Workflow Example
Start with ChaiCode portfolio/tutorial site:
1. Create folder chai-code and navigate: cd chai-code .
2. git init – Initializes repo for your ChaiCode project.
3. Add files: Create index.html (homepage), app.js (basic JS logic), styles.css .
4. Check: git status reveals untracked files in your ChaiCode directory.
5. Stage selectively: git add index.html app.js (skip CSS for now).
6. Commit: git commit -m "Initial ChaiCode homepage and JS" .
7. Iterate: Edit app.js to add a “Brew Code” button function, then git add app.js , git commit -m "Add interactive brewing feature" .
8. History: git log --oneline shows clean ChaiCode evolution like e4f5g6 (HEAD -> main) Add brewing feature .